
(Note: This article was written in December 2018, well before the coronavirus pandemic. Please use your discretion when exercising outdoors – don’t run near others and you can consider wearing a face mask even though it’s not mandatory, because there are always sabo-kings who don’t follow the rules. That said, it’s a perfect time for this post since school’s just started. If you’re a freshman, it’s a good idea to keep up a fitness regimen so you don’t lose your fitness from NS or your JC/sporting sporting days. If you’re a senior, you might want to get back in the swing of things! I should know since I’m about 10kg heavier than when I wrote the article… Also, this is a cross-post with my blog so you can check out the post on kickinguy.wixsite.com/thegreatestblogever and it really helps me out because my mental state is directly proportionate to the number of hits I get on the site!)
*SIGH*
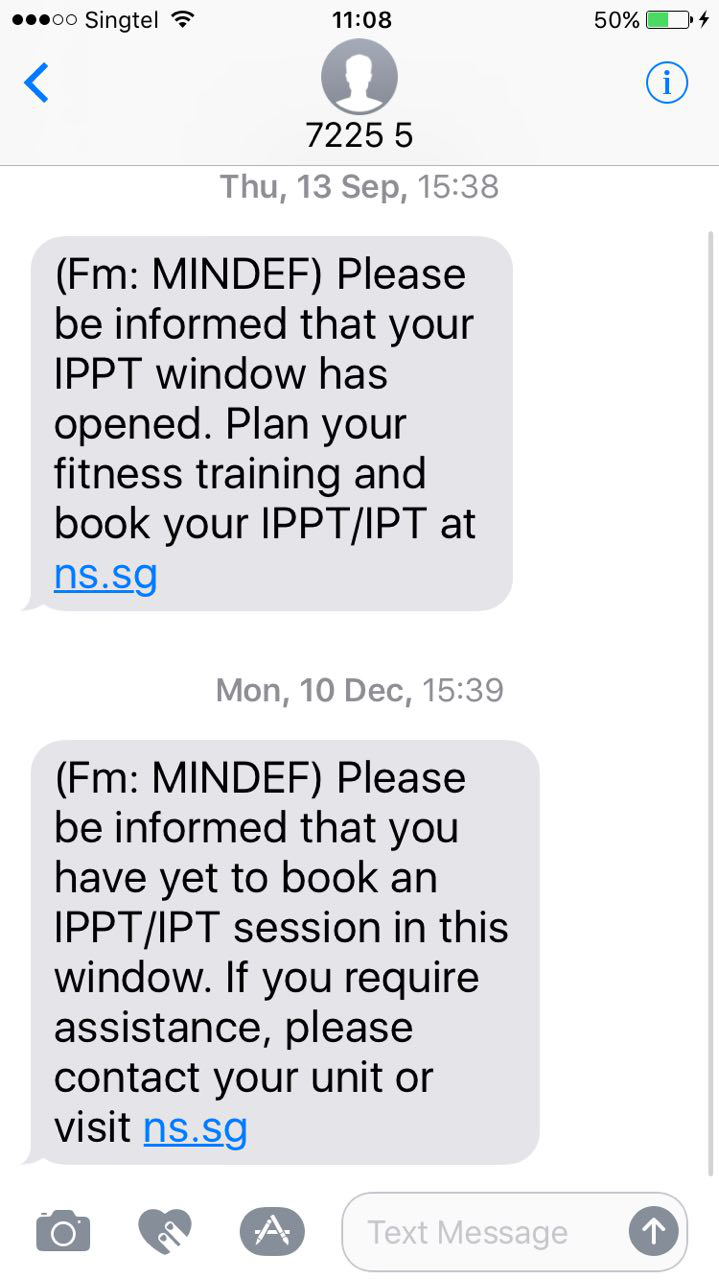
I always get excited when I hear the message notification on my phone because nobody really texts me. Who could it be this time? A FRIEND? A cute schoolmate who’s always admired me from a distance? Maybe it’s eve- OH CRAP!

Training for the IPPT as a free man is hella different from training for it as a soldier. These days, I’m not only carrying 7-kilograms’ more dead weight, but my daily schedules are mostly spent slouched in front of a desk instead of pissing lightning and crapping thunder (just kidding, my NS was mostly spent engaged in deadly combat or international-level football… on the office PS4). I’m not going to let anything stand in the way of what should be an easy $500 from the government and I’ll be damned if I’m not going to snatch back my parents’ taxes! AND HERE’S HOW I’M GOING TO DO IT!
(Disclaimer)

(Obviously, I’m not going to write this article over the few months between now and the deadline, but this is actually what I plan to do. I think the IPPT is a fun fitness test for both boys and girls to attempt, so I hope you dear readers will try training to get a good score! Bear in mind that I’m just a fitness enthusiast and not a certified personal trainer — Please know your own body before deciding to follow my idea blindly. TL;DR: THIS IS AN ARTICLE FOR ENTERTAINMENT PURPOSES AND IS NOT A SUBSTITUTE FOR PROPER FITNESS INSTRUCTION.)

Introduction
First things first, I’ve got to set my targets. If you train hard, you should be able to hit 85 points in a few months. If you’ve got more time to train (like 6 months), there’s no reason not to aim for anything less than 100 points!
Ultimately, I hope to perform:
- Push-ups: 60
- Sit-ups: 60
- Running: 08.30
- Pull-ups: 20
I’ll discuss each of the exercises individually, then sum it all up with a final overall plan!
Note: I include pull-ups because it’s not healthy to focus on just pushing exercises. In any case, everyone should try to be able to do a decent number of pull-ups for general health.
Push-Ups
Exercise Form
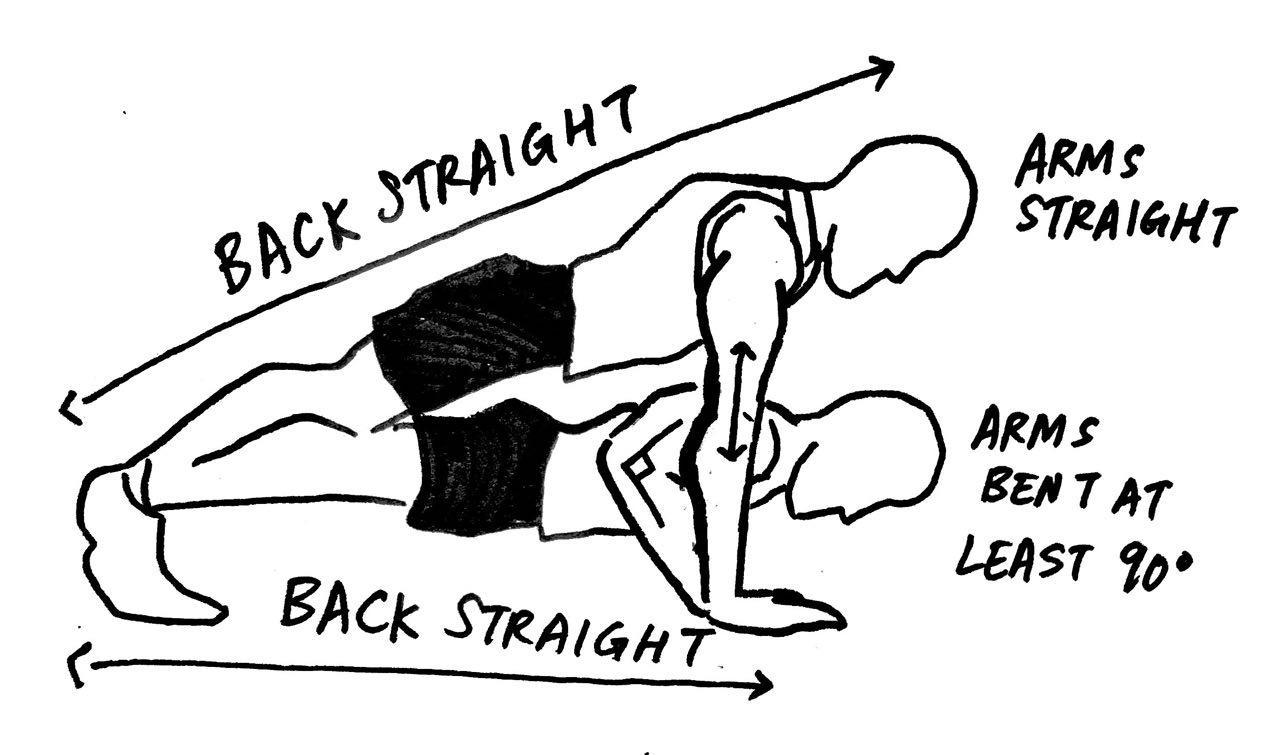
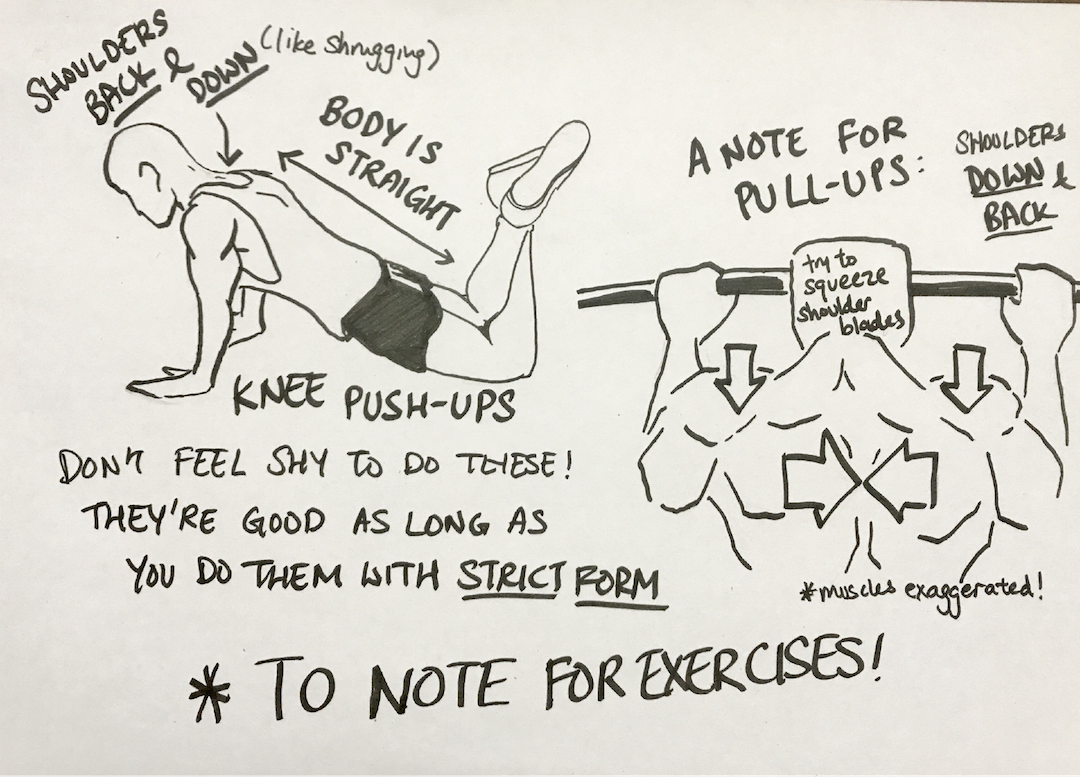
Start: Lie down on your stomach with your feet either closed or apart
Hands should be below your shoulders, fingers pointing forwards
Up: Push off in 1 motion so the body moves together, in a straight line (knees, waist, neck)
Down: Lower your body till the upper arms are parallel to the ground and your chest is 1-fist high
Tips:
- Breathe — inhale on the “down”; exhale on the “up”
- Consciously squeeze your chest and triceps when pushing, and clench your glutes (butt) and core to create tension that makes you stronger
- Keep your stomach tight by imagining being punched in the gut to prevent your hips from sagging (no-count).
- Keep your arms fairly close (between stuck-to-your-sides and completely-flared-out — your preference) and point your elbows behind. This is the correct posture to stop injury.
- Shrug your shoulders back (shoulder blades together) and down to prevent injury.
Assessment
The push-ups section is conducted by performing the maximum number of push-ups within 60 seconds. It is measured either by a fitness trainer (usually from Certis) or by the infamous ELISS machine.
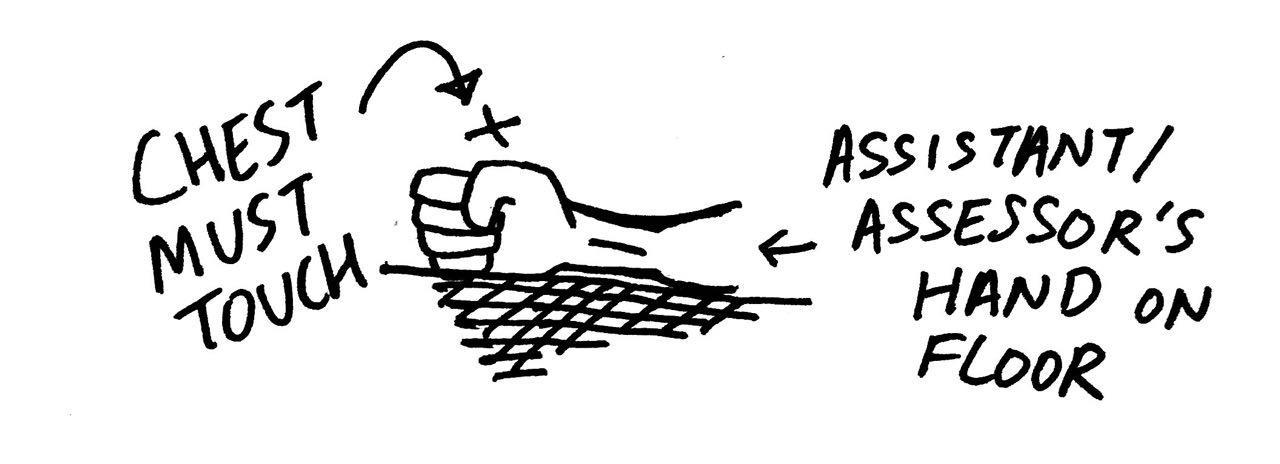
The fitness trainers observe your form closely and require that your body stays straight and that your chest goes low enough to touch the trainer’s fist — like so:
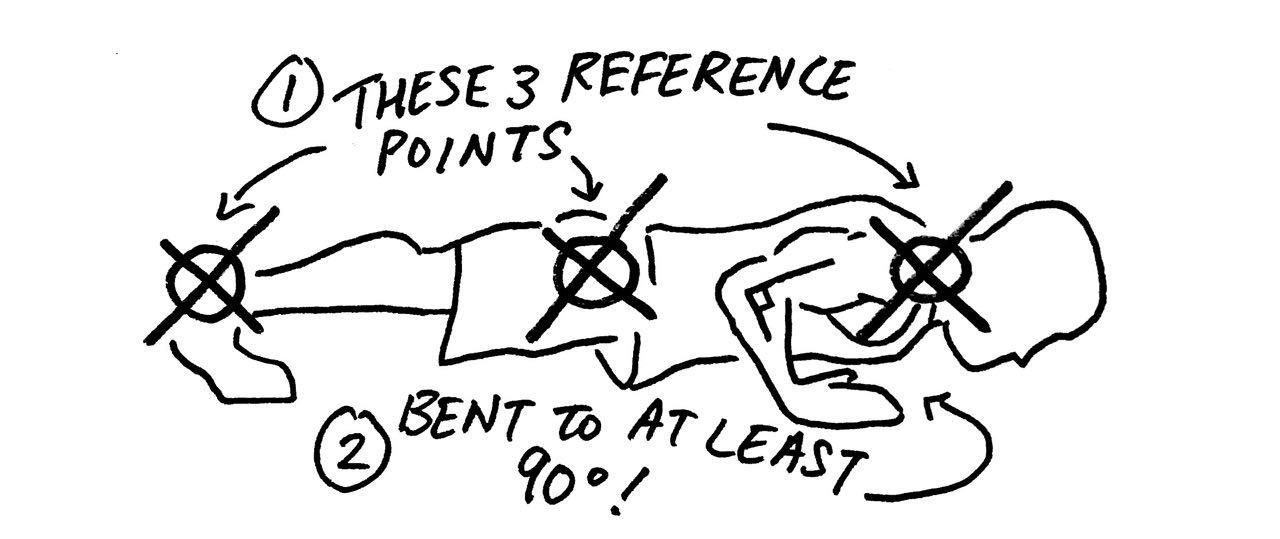
The ELISS machine observes your form (interestingly, using an XBOX Kinect) and also requires that your body is straight, but only that your arms hit a right-angle when doing a push-up — like so:
In my opinion, the ELISS machine is easier because you don’t have to go as low as you would need to with a live trainer counting your reps. It might be a bit more strict when it comes to keeping your back straight but that’s a good habit to have when exercising anyway.
Strategy
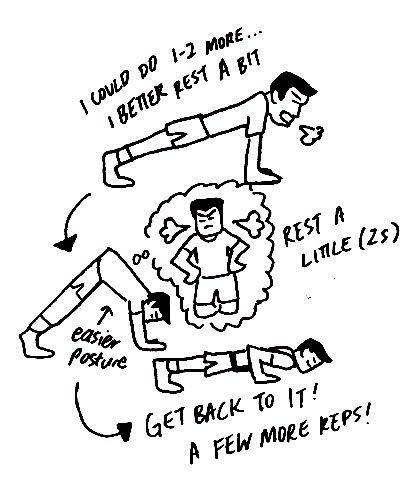
The push-up movement has 2 positions: “up” and “down”. Neither position is a “resting”-type position because your arms will always be holding your weight up. Hence, every second spent “resting” in the “up” position will only drain your energy.

The way to score the most reps is to sprint all the way and perform more reps while you are fresh, only stopping when nearing muscle failure to squeeze out a few more reps.
The way to train is simple: focus on building the push-up muscles (chest, triceps — back of arm, and shoulders) and then training to finish the repetitions in the time limit.
Training plan
Phase 1: 0-20 push-ups
At this point, my muscular strength is lacking to the point that each push-up is significantly difficult. I need to do a bodybuilding-type strength-building routine so I’m strong enough to perform each push-up more easily. I’ll focus on doing relatively tough exercises that I can only do about 10 reps for, since building muscle requires sufficiently heavy exercises.
To this end, I think one good method is to do drop-sets: moving from a difficult exercise to an easier exercise to thoroughly fatigue the muscle. You do the first exercise, either to the point of failure or to the prescribed reps, then immediately finish the prescribed reps for the next exercise. Rest for about 2 minutes before doing the next set. This way, you don’t force yourself to do more reps of a poor quality (which are useless) because you can do high-quality reps of an easier exercise which would train your muscles more.
I would do this workout every other day.
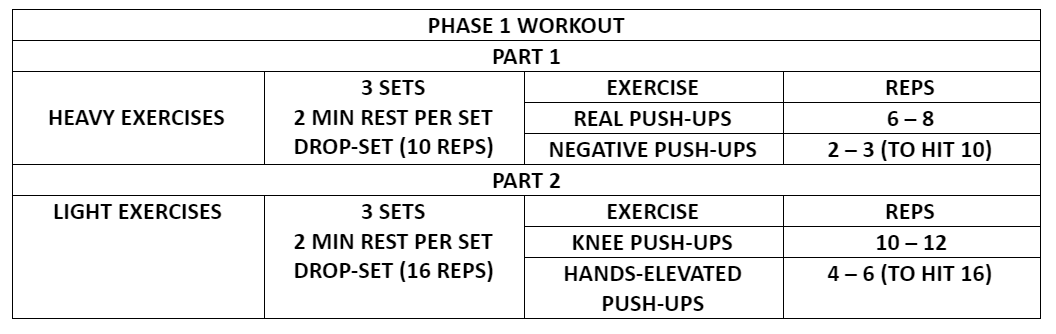
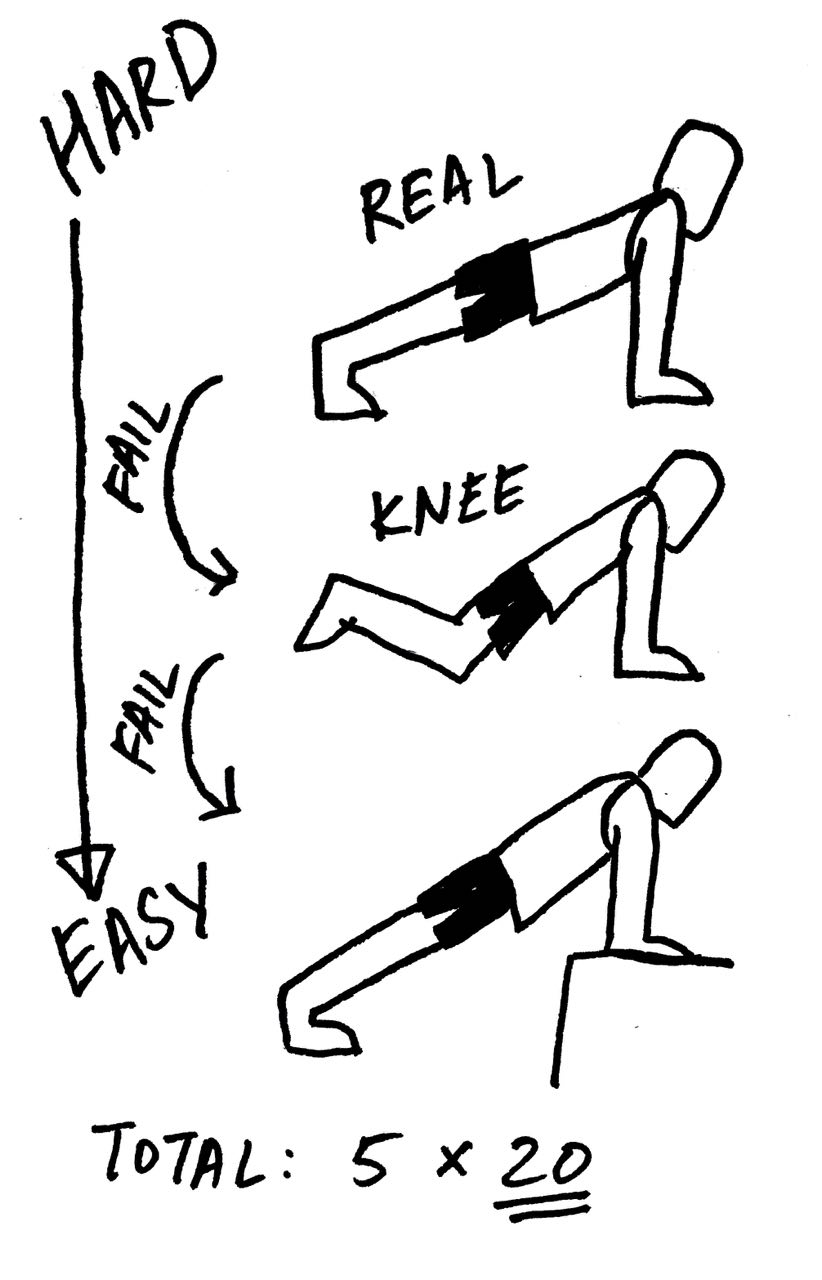
Phase 2: 21-40 push-ups
Once I can do at least 20 reps of push-ups, my muscular strength is less of a concern and I should focus on my muscular endurance next. The only way to train your endurance is to do more reps with less rest.
You’ll notice that I love to do drop-sets. Here, I plan to do real push-ups, knee push-ups, and hand-elevated push-ups. By chaining together more exercises, I push myself more as I repeatedly fall back on increasingly easy exercises as I hit muscle failure. Performing more reps obviously directly contributes to the goal of improving my endurance.
I would do this workout every other day.

Fall back on easier exercises to hit the 20 reps, but only when you hit muscle failure! Rest 2 minutes per set.
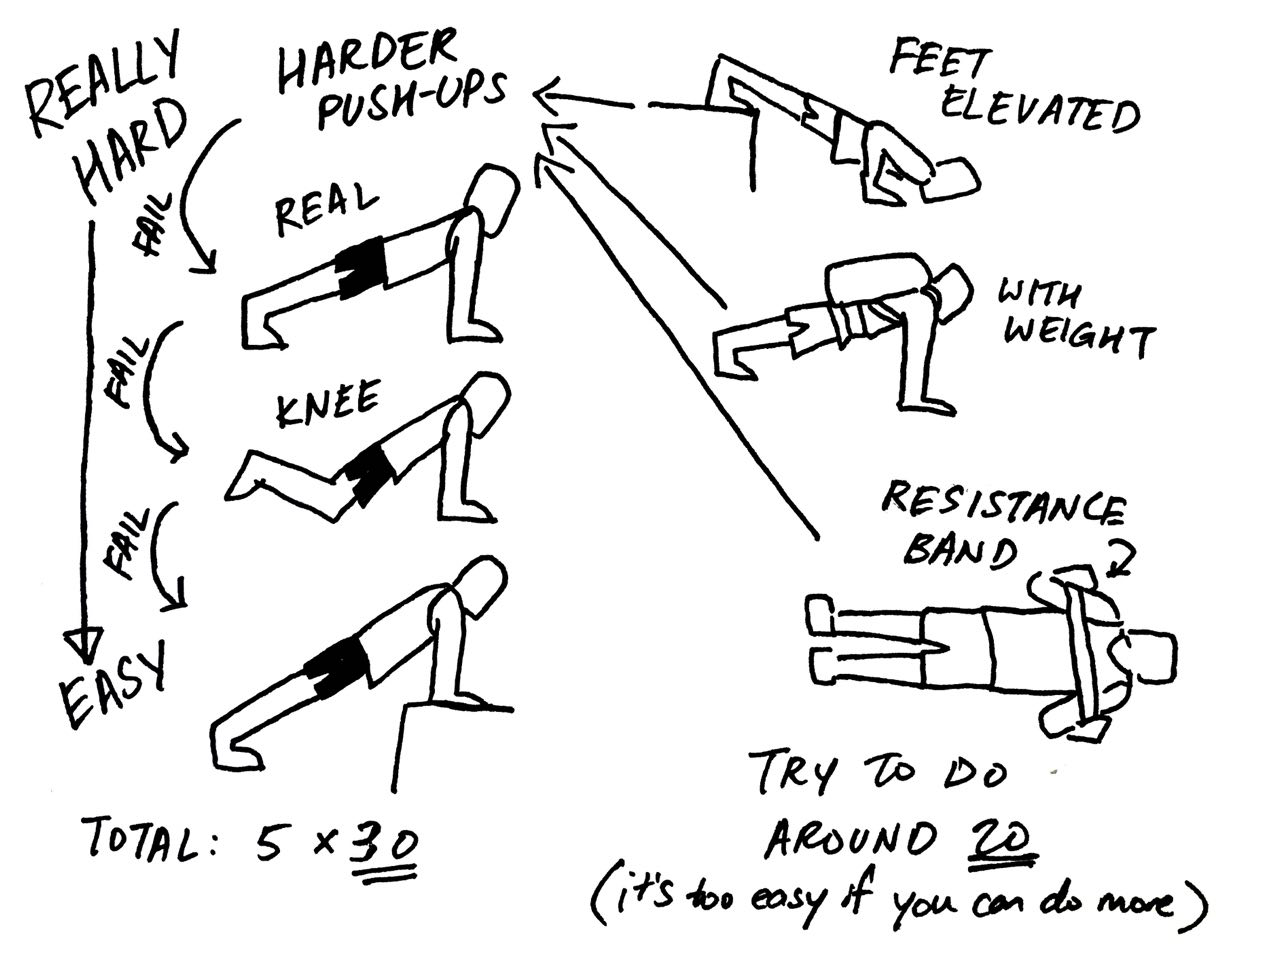
Phase 3: 41-60 push-ups
Once I can do 40 push-ups, there are a few obstacles blocking my way to the coveted 25 points. It obviously wouldn’t hurt to: get even stronger (as making each push-up easier would probably help); improve my endurance (duh — I want to do more reps); do my push-ups faster (sometimes I can actually do 60 reps, but I run out of time).
To accomplish this, it’s a good idea to have several workouts because it’s foolish and inefficient to try to achieve too many training goals in a single session. I would split it into A (strength and endurance) and B (speed).
I would work out every other day, alternating between workouts A and B each time. However, if you feel like you want to improve your maximum strength or endurance in particular, I don’t think there’s anything wrong with focusing on either A or B, since both of them are pretty challenging and would contribute towards reaching the goal of 60 push-ups in 60 seconds.
A: Strength and Endurance
Normally, I don’t like to mix these 2 types of training because they sometimes clash. For example, it would be stupid to try to increase my 1-rep max bench press and then do many reps with a lower weight. However, training to do more push-ups is a bit different because it isn’t THAT challenging of an exercise in terms of raw weight (this is my own strange logic, which may not be entirely accurate) and training with higher repetitions can still contribute to strength increases.
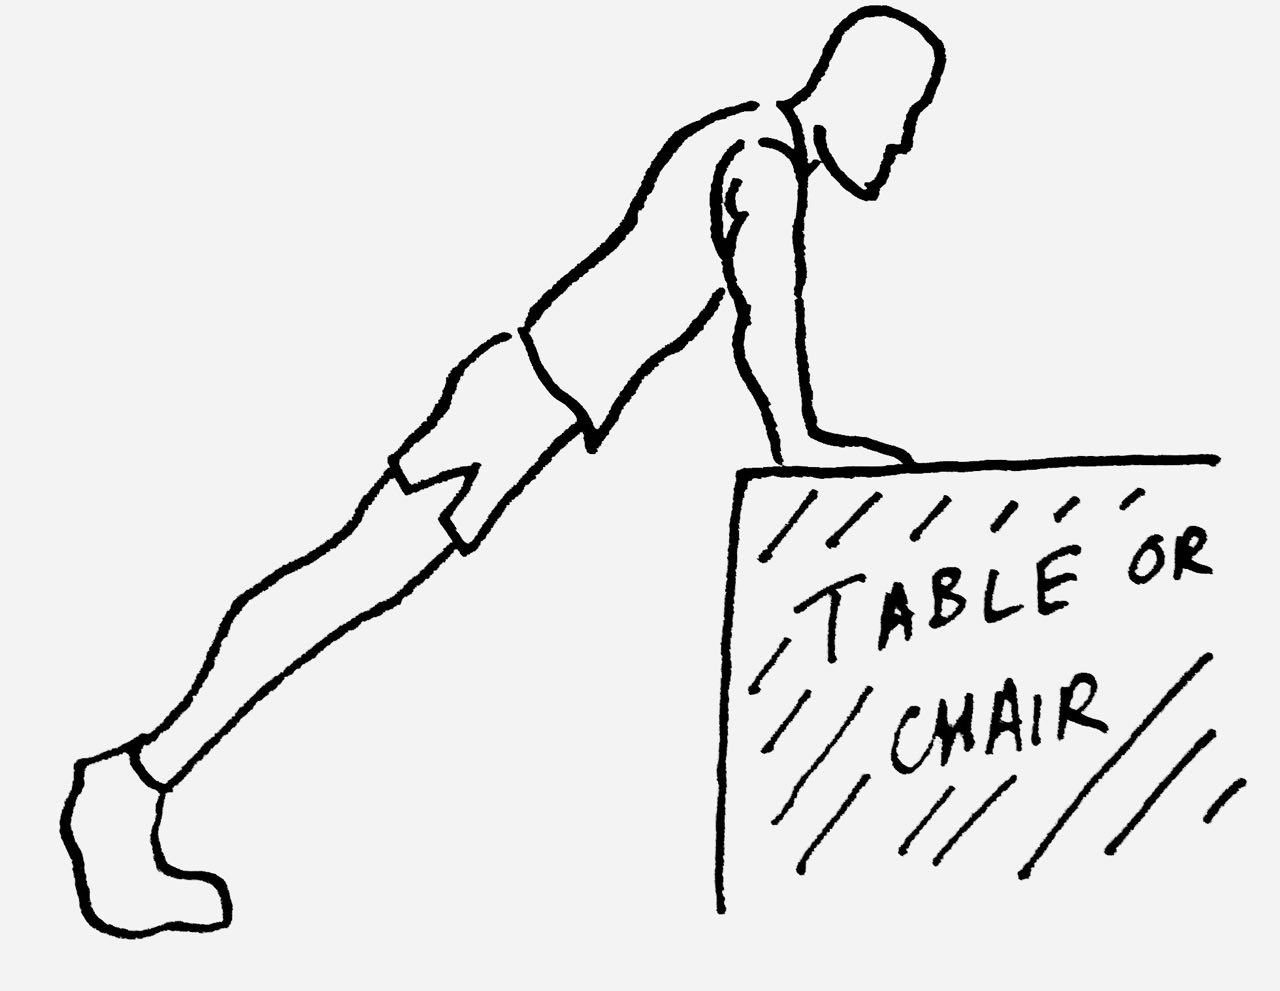
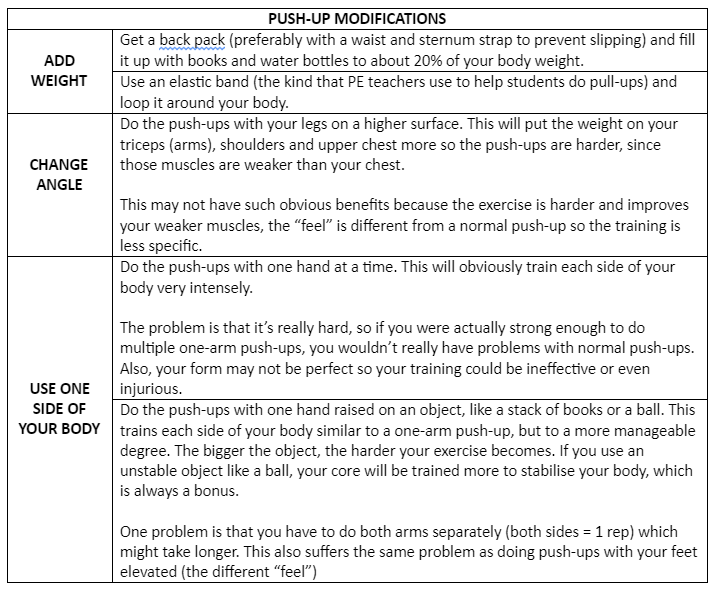
My suggestion is to build on the previous phases by starting the drop-set with a heavier push-up. This can be done in several ways: adding weight; changing the angle; and not using both hands.

B: Speed
The idea is similar to doing past-year papers before an exam. The other trainings for your muscles are like topical practice or reading the textbook.
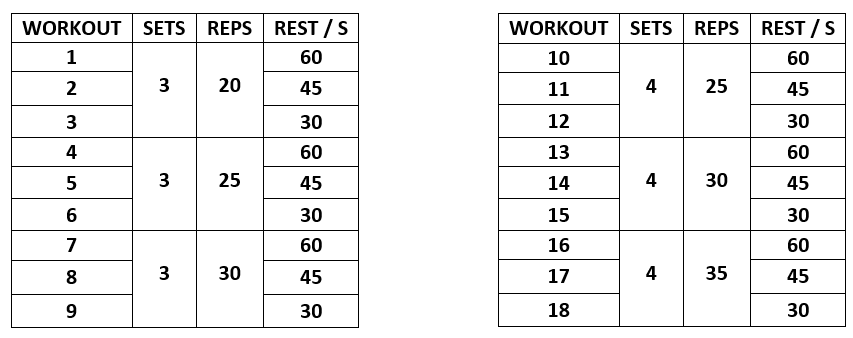
Doing the 60 second test itself is a bit stressful (maybe it’s my own anxiety or I’m just easily stressed), so it might be more conducive to practice it in blocks. Break up the 60 reps / 60 seconds into blocks and practise those blocks with the focus of hitting the required reps in the time limit (with good form). Your sets:
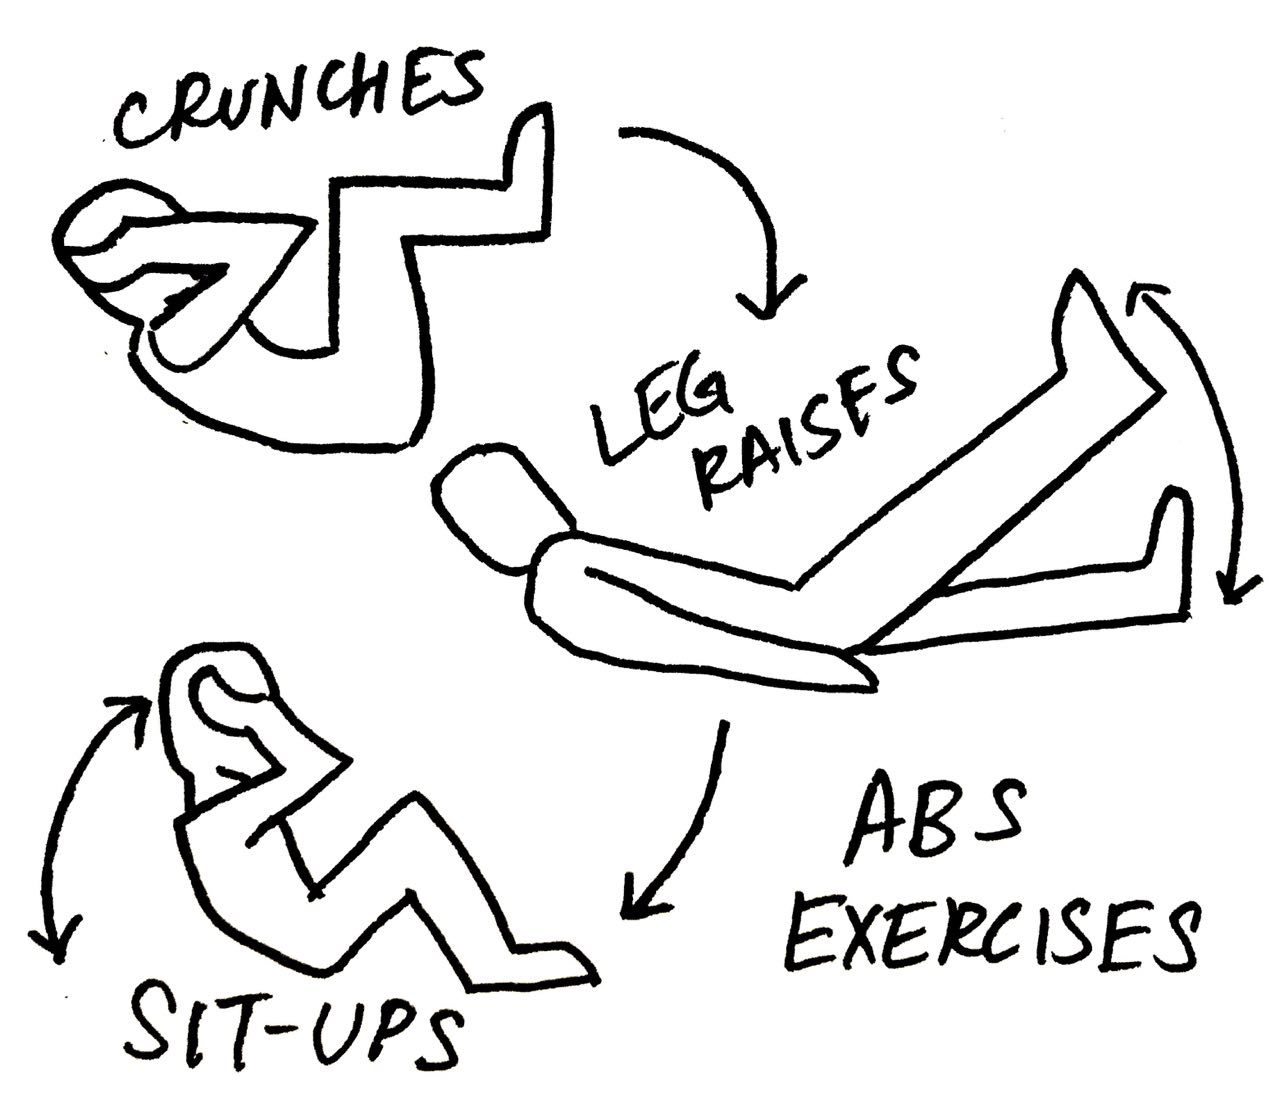
Sit-Ups
Exercise Form
Start: Knees bent, soles of feet on the floor
Gently cup ears (do not grab!), SHOULDER BLADES ON THE FLOOR (don’t cheat!)
Up: Tighten core and draw belly button into the spine (just a cue to show what it feels like)
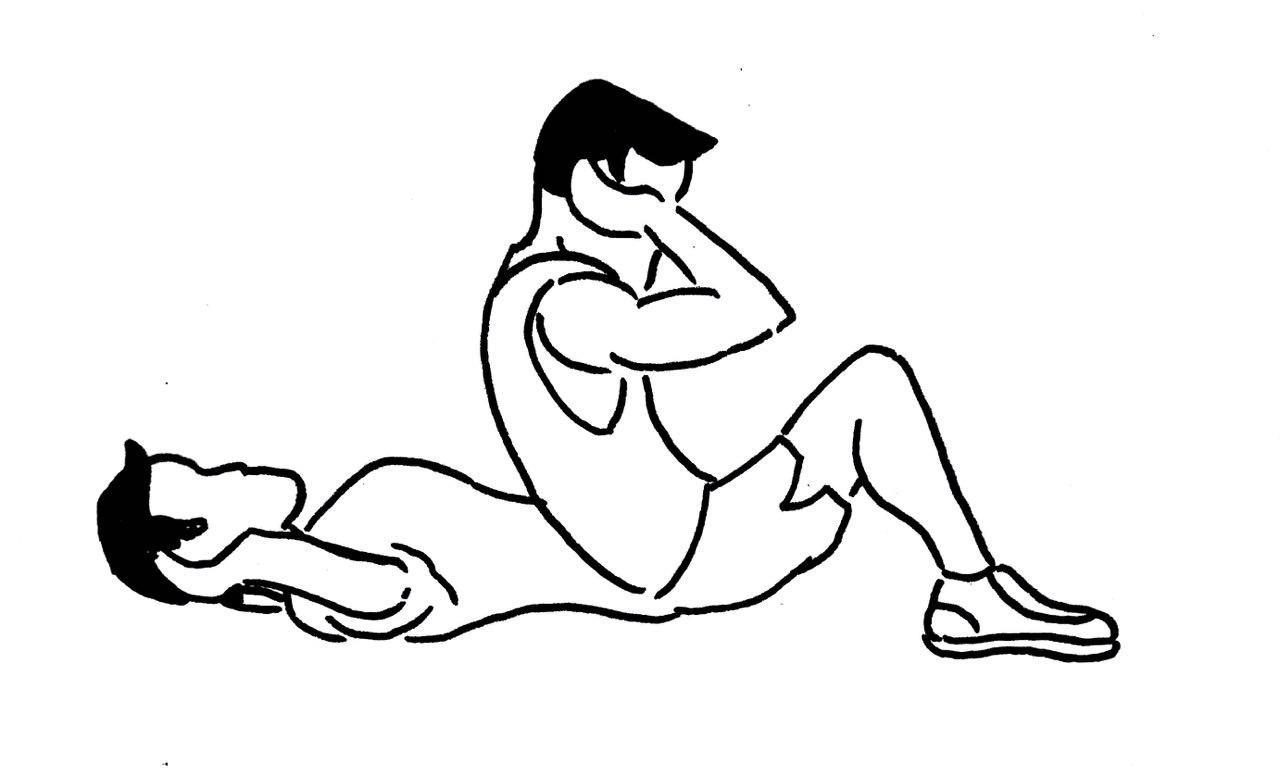
Lift head, then torso till ELBOWS TOUCH KNEES (don’t’ cheat!)
Tips:
- Relax on the way down to save time and energy
- Don’t bounce up using momentum by slamming the floor — hurts your back
Assessment
The sit-ups section is conducted by performing the maximum number of sit-ups within 60 seconds. It is measured either by a fitness trainer holding your ankles or by ELISS with your feet bound by Velcro straps.
Like the push-ups test, the trainers and ELISS have a similar means of counting reps.
The trainers ensure that your shoulder blades hit the floor every time you go down and your elbows hit your knees when you go up.
ELISS ensures that your back leaves the floor (the sensor detects the highest point of your body on the floor as your shoulders), but doesn’t detect whether your elbows go all the way to your knees (the supervisors ensure that).

Hence, it’s a bit easier to do them on the ELISS because the judging is less strict (depending on how vigilant the supervisors are), but some people prefer to have a person hold your ankles when doing sit-ups.
Strategy
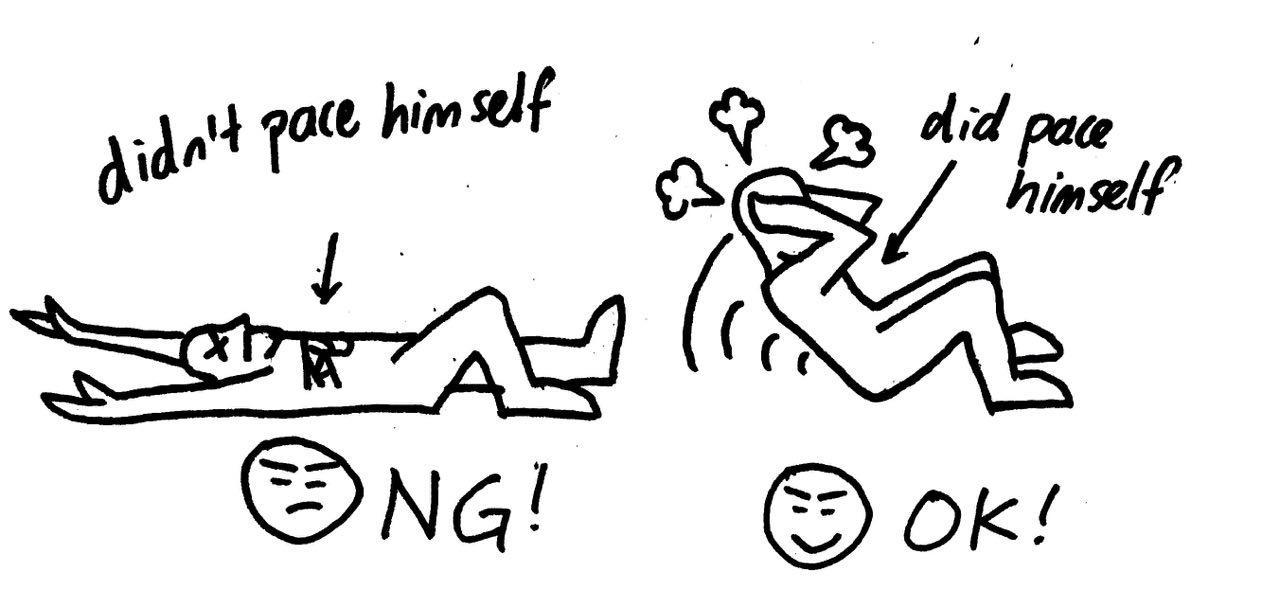
The sit-up movement has 2 positions: “up” and “down”. Obviously, the “down” position is a “resting”-type position because you don’t have to hold your weight up. While the ideal way to score the most reps is to sprint all the way and perform all 60 reps while feeling fresh, it may be more realistic to pace yourself by doing the push-ups consistently throughout the 60 seconds so you do not over-exert yourself and run out of energy for the remaining time.
For example, sprinting-out 40 repetitions in 30 seconds but having so little energy left that you only manage 5 more sit-ups would be undesirable. It could be better to initially do 10-12 sit-ups in every 15 seconds, then improve the pace to 15 seconds in 15 seconds in later trainings.
Most people can reasonably expect to do about 40 sit-ups in 60 seconds (I hope!). Therefore, I think that most of the training should be spent on improving endurance and the pacing for the test. Training the sit-up muscles more would be nice, but not essential unless one is particularly weak (like below 30 sit-ups). The sit-up targets the core muscles like abdominal muscles (6 pack muscles) and the hip flexors (they’re in front of your thighs/waist and you use them when you raise your knee to your stomach).
The training would consist of 2 types of sessions: Strength and Pacing.
If you are not very strong (under 30 sit-ups), do the Strength training every other day and test your sit-ups once a week.
If you can do over 30 sit-ups, do the Strength training and Pacing training on alternate days. Normally, I wouldn’t advise someone to train a single body part every day. However, I think (more accurately, I read it in an Arnold Schwarzenegger book, so take with a pinch of salt) that the core muscles are used every day in both sports and normal activities, so they need to be trained even more often than, say, chest or back muscles.
If you can easily do 50 sit-ups or are only struggling to meet the 60 second time limit, I would do the strength training on the Pacing day as well, either right after the Pacing training or at another time in the day.
Training plan
Strength Training
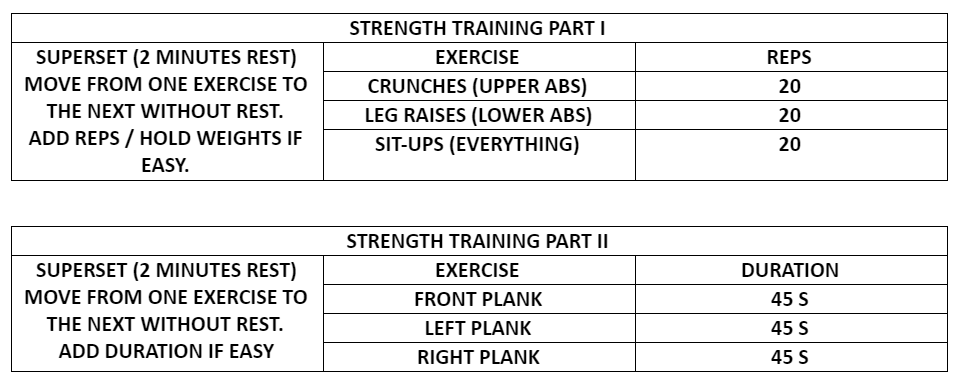
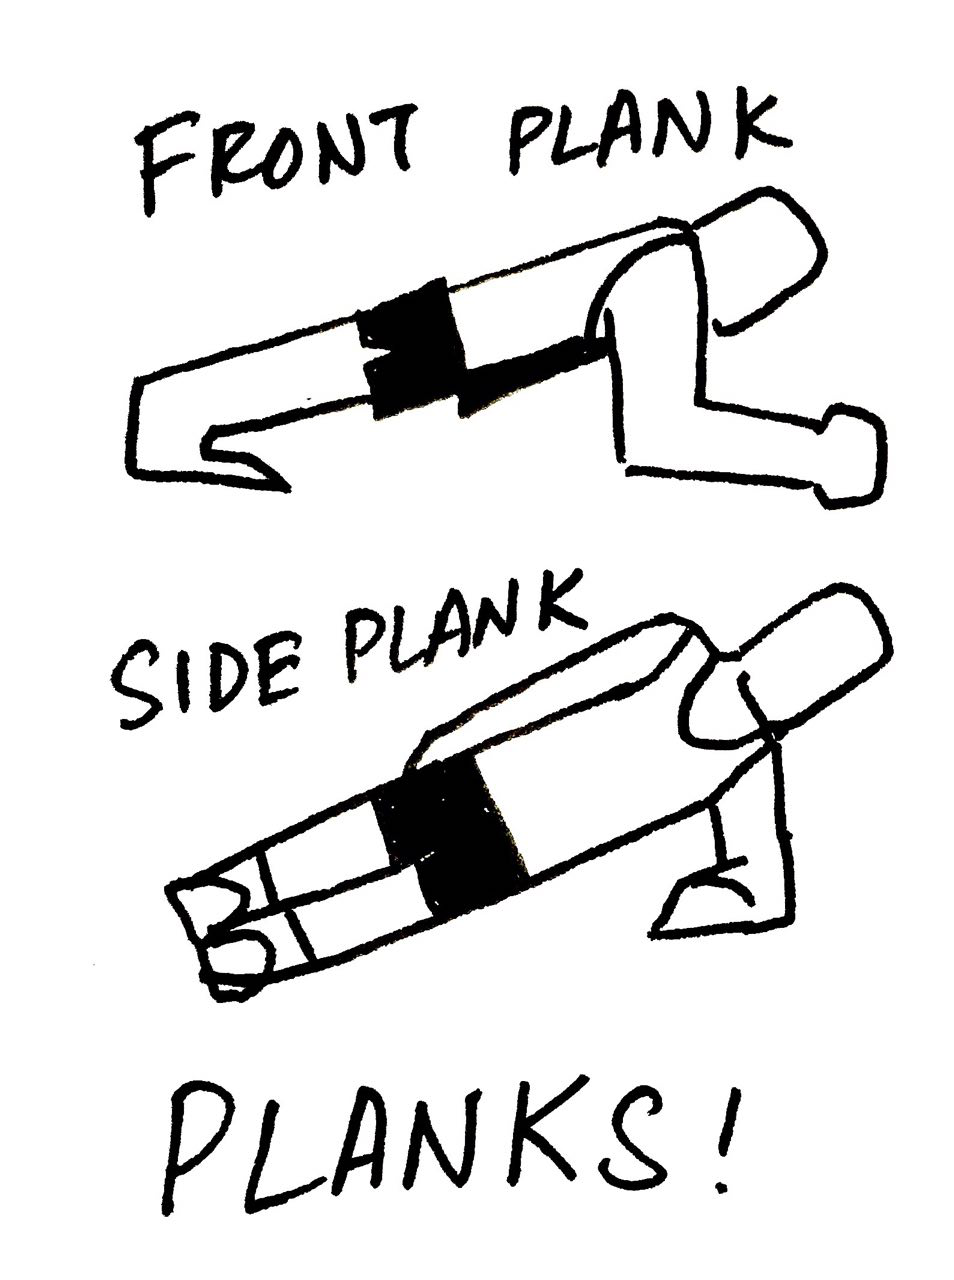
One way of approaching core training is to superset core exercises. I like to do an upper abdominal exercise, a lower abdominal exercise and something that targets all the abdominal muscles, for a total of 3-4 supersets. I end of the training with 2-3 sets of plank supersets.
Pacing Training
Once I have a basic level of abdominal strength, I should work on the pacing to maximise my score for the test.
Firstly, I need to attempt the sit-ups test to decide how tough my training should be. I should aim for a pace of about 5 sit-ups more than my score for the test. This is because trying to do too fast a pace would be too difficult to achieve (and I would just fail the goals for the session), and aiming for the same pace I achieved would be ineffectual training.
For example:
If I can do 40 sit-ups in 60 seconds, I would train to do 45 sit-ups in 60 seconds, which means 15 sit-ups in 20 second intervals or about 11-12 sit-ups in 15 second intervals.
If I can do 50 sit-ups in 60 seconds, I would train to do 55 sit-ups in 60 seconds, which means about 18 sit-ups in 20 second intervals or about 13-14 sit-ups in 15 second intervals.
If I can do 55 sit-ups in 60 seconds, I would train to do 60 sit-ups in 60 seconds, which means 20 sit-ups in 20 second intervals or 15 sit-ups in 15 second intervals.

Perform the sit-ups test every week and adjust the pacing for each session according to your current standard.
PULL-UPS
Pull-ups are no longer tested as part of the IPPT (phew!) but are an important benchmark of strength for both boys and girls. Training your pulling muscles will also balance out the pushing work you have been doing in training for push-ups to prevent shoulder injuries.
Exercise Form
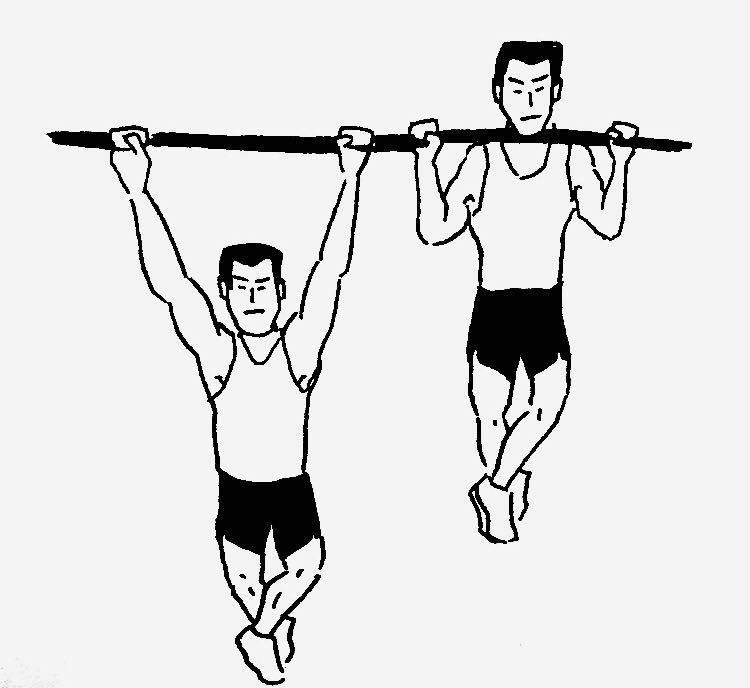
Down: Grip the bar slightly wider than should-width with palms facing away
Hang with arms fully extended
Keep shoulders flexed (pull shoulder blades together) to prevent injury
Up: Pull up until chin reaches the bar
Tips: Posture Cue — pull the bar down and point your elbows downwards
Lower yourself in a controlled manner (don’t just drop)
Exhale while pulling up
Keep stomach and glutes tight to prevent swinging
Strategy
In my opinion, the strategy to do the most consecutive pull-ups is the same as for push-ups: do as many as you can, as fast as you can (without rushing and using bad form, of course).
Training plan
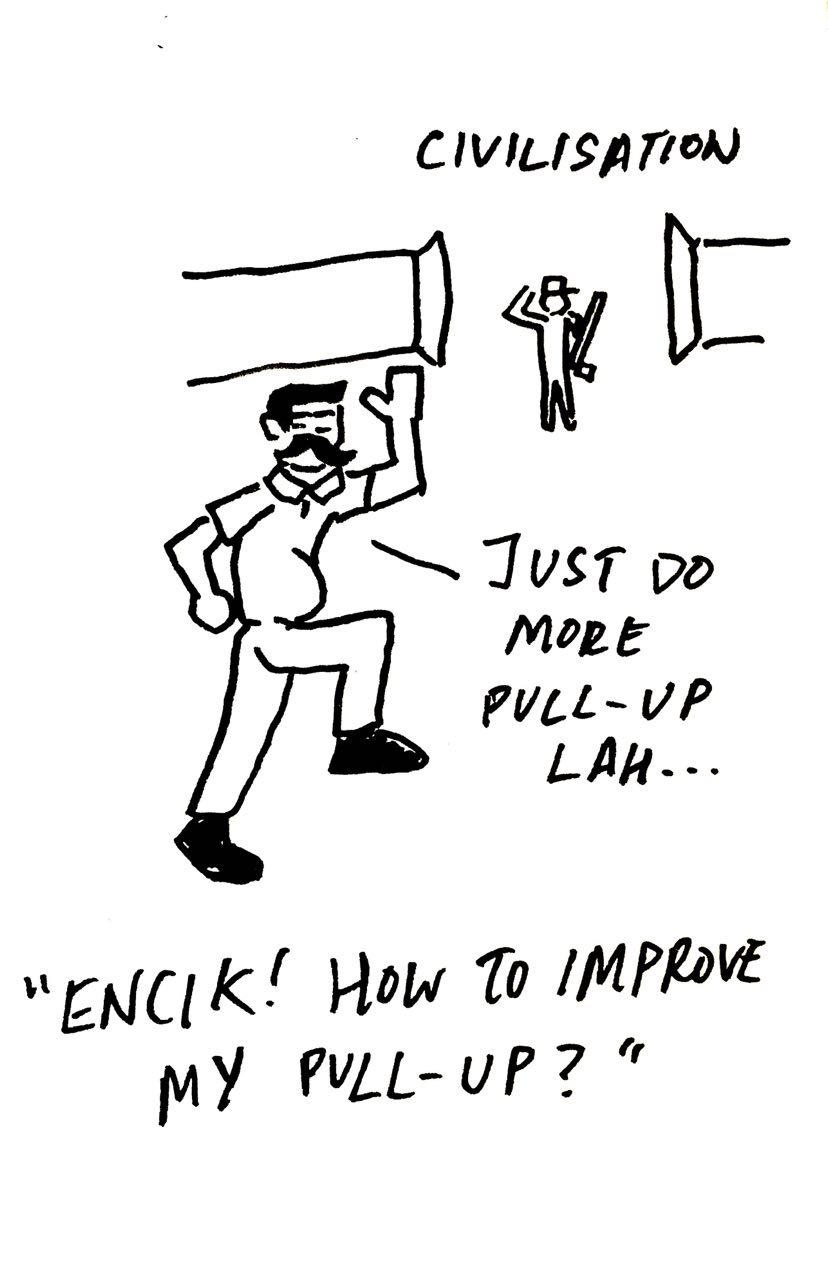
Pull-ups are a very challenging exercise because your upper body strength must hold up your entire body weight, which is always “too high” (not in the sense that you need to lose weight — my point is that your body weight will always be considered a challenging weight to handle).
I think the only way to do more pull-ups is to… DO MORE PULL-UPS! (That’s probably the same “useful” advice that your encik half-heartedly offered while he was rushing to book out.) While you can do bicep curls or lat pulldowns or bent rows to train your back and biceps, I feel like the best way to train to do more pull-ups is to work the relevant muscles in the same way they are going to be used — through the actual movement.
Even if you can’t do a pull-up, or can only do a couple, this can be accomplished by doing easier exercises that share the same movement (like assisted pull-ups, negative pull-ups). Once you can do around 8 pull-ups, it’s a lot easier to improve your numbers.
Phase 1: 0 — 3 pull-ups
At this stage, it’s pointless to do any pull-ups at all. Even if you can do 3 pull-ups, doing just 1 would sap your energy to the point that you probably won’t be able to exercise properly for the rest of the session. Therefore, it’d would be smarter to focus entirely on easier exercises that you can do more reps of.
Start off by doing as many negative pull-ups as you can. This means that you jump up into an “up” position, hold yourself there for as long as possible, then lower yourself such that you reach the “down” position after 5 seconds.
Once you can no longer lower yourself slowly, stop doing negative pull-ups and just do pull-up holds. This means that you just jump into the “up” position and hold yourself there for as long as possible. Once your arms give out, drop down from the bar, carefully. This is important since you can hurt your shoulders and elbows if you straighten your arms too quickly when you don’t control your descent in a pull-up.
Perform the above exercises for a combined 8 reps — that’s one set. Your workout is 3-4 sets of that. Keep the rest period long so your muscles can recover to do the next sets with as good form as possible. Perform this workout every other day until you can do 3 good pull-ups.

Phase 2: 3 — 8 pull-ups
This phase is pretty similar to Phase 1 and the only difference is that you can start doing some reps of real pull-ups. Again, keep the rest periods long because you want to focus on building strength. Perform this workout every other day until you can do 8 reps of pull-ups in every set.

Phase 3: 9+ pull-ups
At this point, your muscles are already pretty strong so it’s easy to get stronger. At my very best, I could only ever do around 16 pull-ups, so I can’t guarantee that these methods will certainly work, but you could do worse than to follow this. I know of 2 approaches to rapidly increase your pull-up reps.
Approach 1: Idiot method
This is the super-secret, powerful training I used to do on my top-secret island facility: do 1 set of maximum pull-ups in the morning and 1 set of maximum pull-ups at night. Rest on the weekends or as needed.
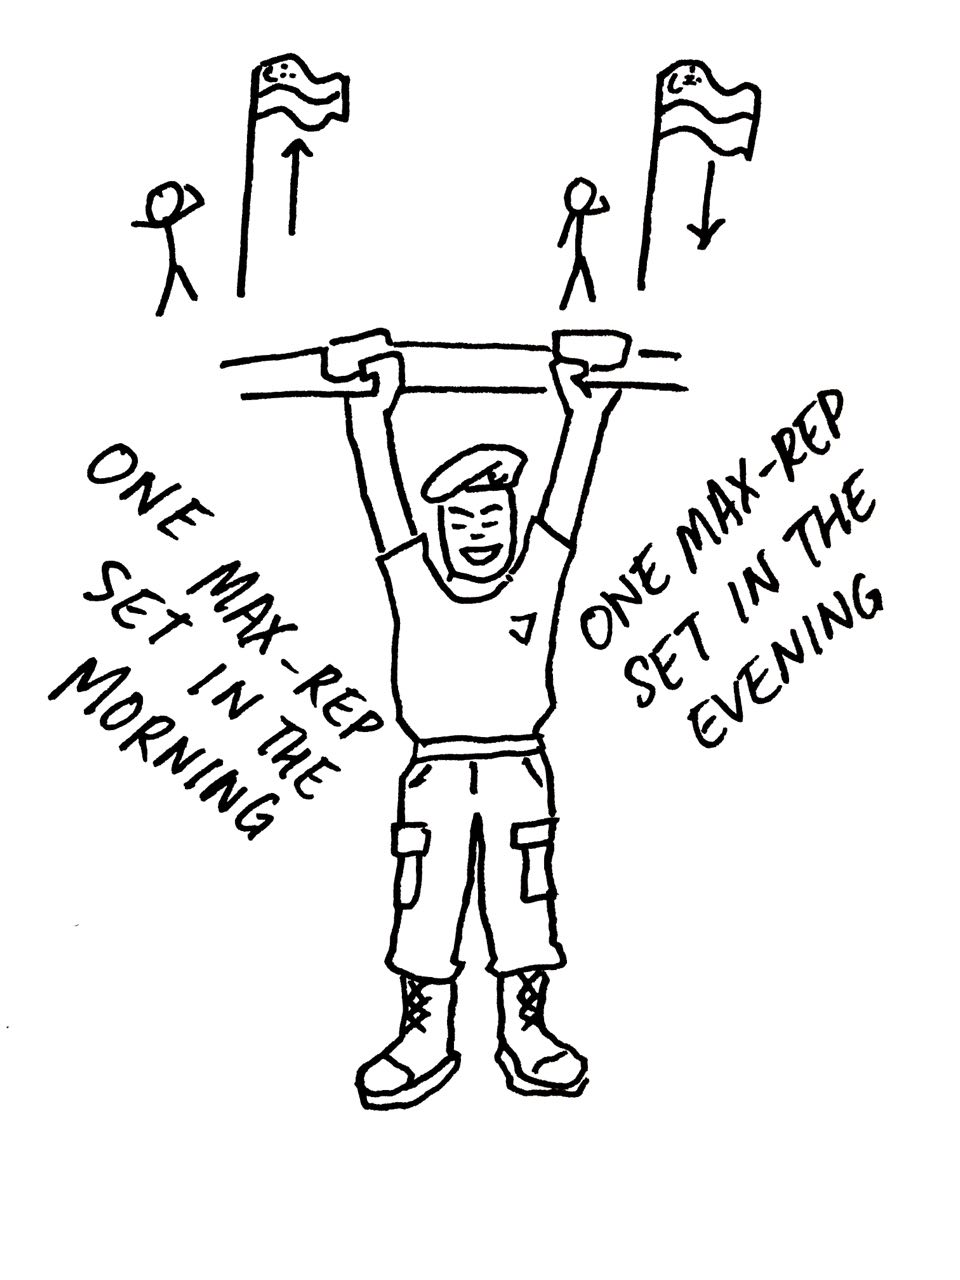
That’s it. Which is probably why I never got beyond 16 pull-ups. What I really like about this approach is that it’s easy so you can do it every day, and all you need is a minute so you can do it when you wake up or go to bed.
Approach 2: Russian Fighter Pull-up Program
I read this on some bodybuilding forum and I think it’s a pretty popular routine. That’s probably at least partly due to the really macho, cool name.
The idea is that you start off doing an easy workout: 5 sets of 5-4-3-2-1 reps with 1-2 minutes’ rest. You slowly ramp up the difficulty over a month by adding 1-2 reps to every workout, which is how you improve. Since each workout is pretty easy, you should be able to handle it on consecutive days, resting only on the weekends. Here is an example:
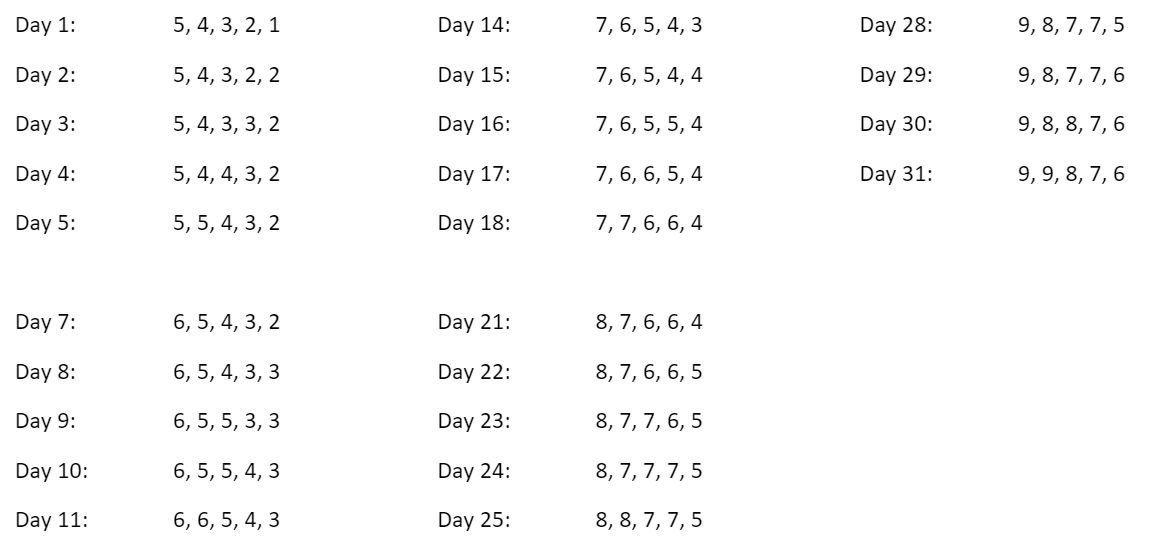
I imagine you could do this till you hit something like 12, 12, something, something, something and you should be able to do 20 good pull-ups by that point. If not, just keep adding reps to the workout in this format and it’ll work out.
2.4km Run
Exercise Form
While there is no one best way to run, I think the following pointers would be helpful for most people.
- Head: forwards (not too up or down) to conserve energy
- Neck: straight, relaxed, balanced over shoulders to prevent tiring/cramping
- Arms: pump back and forth like pistons, with elbows bent and fixed in place
- Hands: lightly clenched to reduce blood flow to fingers
- Back: Straight but relaxed
- Knees: if on flat ground, do not raise too high (saves time and energy)
- Legs: stride OUT, not up — flat trajectory is more efficient
- Feet: mid-foot strike is good for long distances — land lightly on outer edge of the foot, roll forwards and push off the ball of your foot
- Breathing: up to you, but I like breathing in through nostrils for 2 paces (left-right) then out through mouth for 2 paces (left-right). Mouth breathing is easy but not so sustainable (dries your throat) so do it near the end of the run.
Assessment
At most camps, the running test is conducted at a standard 400m track. Whether ELISS or a stopwatch-timer is used does not change the assessment significantly.
Strategy
I used to really hate running before NS because I could never run a full 2.4km without gasping for breath in the middle. However, if you train correctly, you can get a decent timing fairly easily and even learn to enjoy running.
There are a number of strategies to the 2.4km run. These are the few that I feel are viable.
1 Constant pace
Some people like to run the whole distance at a uniform pace. For example, if my goal is 12 minutes, I run the first, second, third, fourth, fifth and sixth rounds in 2 minutes.
I think this is suitable for: training purposes; aiming to get an easy timing; very fit people who can actually sprint the entire distance.
2 Separate pace — end fast
I know some really good runners (like 7-8 minute) who use the starting 400m as a warm-up and steadily increase their speed to the point that they’re effectively sprinting from 800m all the way to the end.
3 Separate pace — start fast
Some people like to start fast, slow down a bit in the middle and speed up as much as possible at the end.
I personally use this strategy because I’m not confident enough that I can pull out enough strength at the end to run fast enough for the (2) strategy to work. I think it’s the easiest for a beginner runner (like myself) to pull off because I only need to train myself to be able to: run really (relatively) fast for the start (about 1.2km); have enough stamina to maintain a decent relaxed pace later (from 1.2km to 2km); and the mental strength to charge the final 400m.
Training plan
Training would consist of Strength Training, Endurance Training and Speed Training.
Endurance Training helps you run longer distances and improves your general condition. Speed Training helps you run faster (and contributes to your overall condition as well). Strength Training ensures that your body can handle more training and somewhat improves your speed, too.
Strength Training and Endurance Training should be done on the same days, Speed Training on another.
If you are a complete beginner, focus on Strength and Endurance. Perform the Strength and Endurance Training workouts at least 3 times a week, eventually training to be able to run every day.
If you are more advanced and already run every day or almost every day, perform the Strength and Endurance Training on 2 days, then the Speed Training on the 3rd day. Rest 1 day and rinse and repeat. Rest more if needed.
I wouldn’t stress out over when to perform what training. As long as you’re running at least 3 or 4 times a week, you would definitely see improvement in your running ability. If you stress out over having missed a day because of bad weather, then running wouldn’t be fun any longer and your training would become a chore.
Strength Training
This is an often neglected aspect of training. Training your leg muscles not only helps you run faster (to an extent) but also strengthens the muscles and ligaments so that they can withstand tough training. I would do this routine 3 times a week on alternate days, preferably on a day where you are doing light training such as jogging.
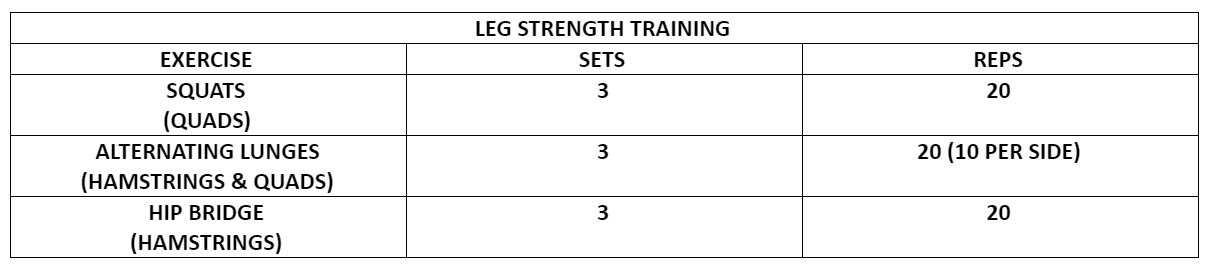
The rest times are not so important, but around 2 minutes per set would be OK. If you cannot hit the prescribed reps, just do what you can because this workout is just extra training and does not need to be so aggressively pursued.
Endurance Training
Endurance training is just long-distance running. I would recommend running by timing instead of by distance because it can be discouraging for a beginner if he feels like he is taking an inordinate amount of time to run a fixed distance. I would start by running for 20 minutes straight, increasing the duration by 5 minutes every 3-4 sessions, based on my comfort level. This should be done at an easy pace such that the training is enjoyable — I should never be having to stop and walk or pant and gasp for air.
Eventually, you should be able to comfortably run for at least 45 minutes at a stretch. When you are more confident, you can start measuring the distance you run so you can decide if you need to run faster. Running 5km in under 30 minutes is a decent benchmark for a beginner, and running 10km in under an hour is pretty good. For comparison, when I could run a 08.30 minute 2.4km, my 10km timing was slightly over 43 minutes.
Speed Training
The way to learn the correct pacing for running any race (the 2.4km run IS a race in which you are competing against yourself) is to run at the specific pace repeatedly so that your body can be used to it. Break up the distance into smaller chunks that you can repeatedly run at a given target pace and repeat it. It’s very similar to the push-ups and sit-ups intervals.
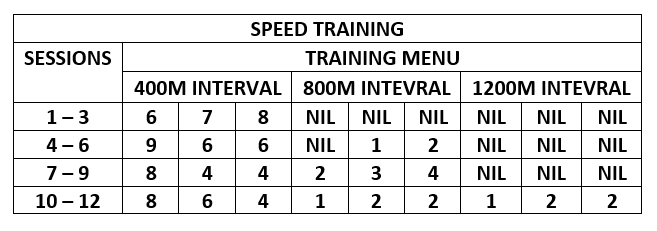
Initially, you would want to start out with smaller distances like 400m. Your training could be something like: 8 repetitions of 400m in 2 minutes each, with 2 minutes rest between repetitions.
As you improve, you could try longer intervals like 80om. However, it is impractical to plan out a workout like: 5 x 800m in 4 minutes each, because longer intervals are challenging and you might not be able to keep the same pace for a longer interval as you would for a shorter one, for more repetitions. Instead, it would be more practical to plan a workout like so: 3 x 800m in 4 minutes each; 4 x 400m in 2 minutes each.
(The table is a little confusing, but look at the corresponding column.
So for Session 1, it’s 6 x 400m, NIL x 800m and NIL x 1200m.
And for Session 8, it’s 4 x 400m, 3 x 800m and NIL x 1200m.
And for Session 12, it’s 4 x 400m, 2 x 800m and 2 x 1200m.)
Putting It Together
Obviously, you should be able to put together your own training routine based on the tips given and built around your own personal schedule. However, with the amount of information given, it might be a bit overwhelming to plan out a very wide range of training activities. Here’s what I am going to do, which might give you an idea on how to set your own training routine:
Out of all the training sections, the Running training is probably the most time-consuming and difficult since I must leave the house and then wash up, whereas the other exercises can be fitted into almost any block of time like before a shower (doing push-ups and sit-ups in the toilet is a good way to reduce your washing load by 1 set of workout clothes). Therefore, I am building my training around the Running training sessions.
For the push-ups, pull-ups and sit-ups, just follow whichever level training you are at.
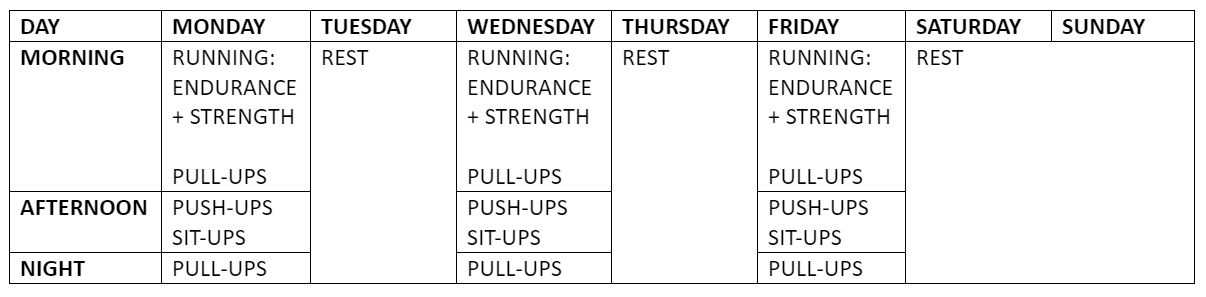
Initially, while I haven’t regained my running ability, I will do this:
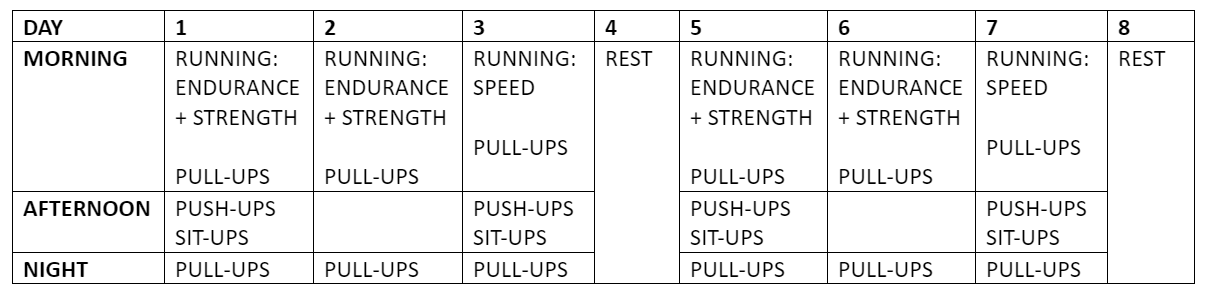
Later on, when my running ability is better, I will do this:
Since the training occurs in a 3-day-work-1-day-rest cycle, the day of the week that I’m working out on will change. I wouldn’t worry about missing a day of training, like if I had something on in the morning of Day 5, I think it’s ok to skip the parts that I can’t do. Missing one session out of a cycle is no big deal if I at least mostly stick to the plan.
Of course, if I have to wake up later I can always just shift the Running session to the night instead of the morning.
IN CONCLUSION
These are some ideas I had regarding the topic of IPPT training and I hope they’ll be useful to you if you decide to try them out. They’ve worked for me and a fair number of the people I’ve previously shared them with during my NS.
I think it’s really hard to keep fit while studying, but it’s super important for our physical and mental wellbeing. I’m going to try my best to exercise more in 2018 2019 2020 so I can be a stronger person to tackle the coming year head-on and I hope at least some of you will try as well!
Remember to check out my blog at kickinguy.wixsite.com/thegreatestblogever